 |
||
 |
 |
 |
 |
 |
 |
 |
 |
 |
 |
 |
 |
Prius Calendar: "F"
for 2011
Last Updated: Mon. 4/18/2011
...plus this calendar featuring the 2010 model from the many photos in the album,
that you may download & print for your own use.
|
|
||
|
|
|
|
|
|
|
|
|
|
|
|
|
|
|
|
PDF format:
|
1. |
Download all of the following files by right-clicking each and selecting "Save Target As" or "Save Link As" (depending on your browser type; one-button mouse users will need to hold the CONTROL key also): Prius_Calendar-2011_Date-Grids.pdf 0.3 MB
Prius_Calendar-F_January.pdf 0.5 MB |
|
2. |
Version X of Reader or Acrobat (10.0) is recommended for
best results. Reader is available free from Adobe...
more info |
|
3. |
Choose a double-sided type of paper to print on... like the high-quality, heavyweight, matte-finish
Hewlett Packard Q5449A. |
|
4. |
Prius_Calendar-2011_Date-Grids.pdf needs to
be printed entirely first. Make sure each page is single-sided. A
photo-collage will print on the back afterward. |
|
5. |
When printing of the date-grid pages completes, remove the entire stack from the
printer and ROTATE it 180 degrees. (Since most printers flip the page over
as it feeds through, you won't need to.) |
|
6. |
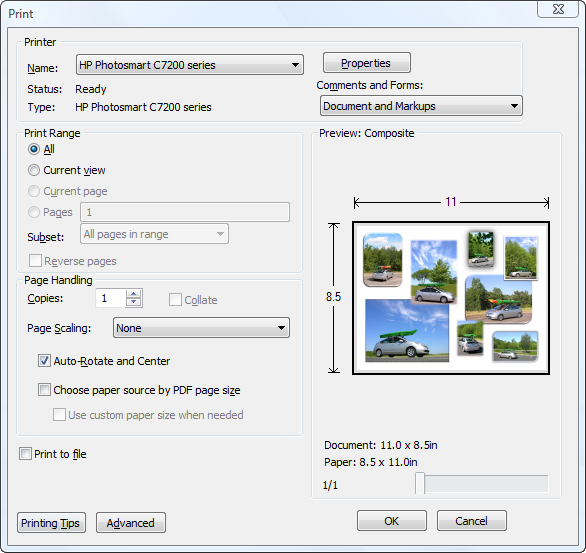
The "Page Scaling" print setting must be
set to none
if you want the exact size of the content to be retained; otherwise, it will be
reduced slightly when Reader adds margins of its own. An example of that
option within the print setting is
shown here. |
|
7. |
Add one BLANK sheet of paper to the top of the stack to be printed. (This
is required because each image will get printed on the back of the next month's
date-grid, so on the back of the January
date-grid will be the February
photo-collage.) |
|
8. |
Submit each month's photo-collage for printing, one at a time using the printed
date-grid stack of paper. (The printouts will end up with the bottom of
the photo-collage matching up with the top of the date-grid on the other side of
the paper.) |
|
9. |
Take the printouts to a print-service to have a spiral-bind added to join all the pages together, or you can just fasten them with a round clip. |
![]()
![]()